Two photographs, taken about eight weeks apart, in the same chair by the same window. That pairing carries more than any single maternity portrait, and it costs you one extra minute of planning on the day of the first shot.
The reason bump to baby photos work is repetition. When everything except the subject stays the same, your eye goes straight to the one thing that changed, which happens to be an entire person arriving.
What has to stay the same in bump to baby photos?
A pair only reads as a pair if the second frame genuinely matches the first. Five things to lock down:
- The room and the spot. Same chair, same corner, same wall behind you. Mark the floor with a bit of tape if you want to be precise about it.
- The light. Same window, same time of day, same weather if you can manage it. Soft indirect window light is the safest choice for both frames, since it flatters skin and never changes character between rooms.
- The angle and distance. Where the photographer stood, how high the phone was, how much of the room is in shot. Standing height versus kneeling changes a photo more than people expect.
- The outfit colors. Not the same clothes (nothing from week 34 fits in week 2), but the same palette. Cream and oatmeal in both. Charcoal in both. Never cream then navy.
- The crop ratio. Pick one, portrait or square, and keep it. This matters most when the pair goes on a wall.
The note that makes the second photo possible
Then make all of it repeatable. Take a screenshot of the first photo, put it in an album called "match this", and write three lines in your notes app. Chair by the left window, 10:30am, phone at chest height, standing about six feet back. Two months later, sleep-deprived and holding a newborn, you will not remember any of that.
Photograph the setup itself as well, wide enough to show the chair, the window and the floor. Rebuilding the scene from that reference frame takes about a minute.
The second photo in a pair is made possible by the note you write on the day of the first one. Thirty seconds of admin, one keepsake.
When should you take the maternity photo?
Weeks 30 to 36 is the window most photographers aim for. Before 30 weeks the bump often photographs smaller than it feels; after 36 comfort drops off sharply, standing for photos gets tiring, and babies have a habit of arriving before the plan does.
If you are already past 36 weeks, take the photo today rather than scheduling it. A slightly late bump photo beats a bump photo that never happened because labor started on the Tuesday.
A full session is not required either. One phone frame in a mirror at 34 weeks gives you the first half of a pair, and matching it later comes down to standing in the same place. That is why the note matters more than the equipment.
The newborn frame, in the first fortnight
Match it in the first two weeks. Days 5 to 14 are the classic window for curled, sleepy newborn shots, and they also happen to be the window where the "so recently inside" feeling is still visible in the picture. Set up the same way you did before, then hold your baby roughly where the bump was, at the same height, in the same light.
Practical notes for the second shoot: warm the room to around 75 to 80°F so an unwrapped baby stays comfortable, keep a spotter within arm's reach, skip the flash entirely, and expect the whole thing to take four attempts across three days. That is normal. Our newborn photography lighting guide covers the window setup in detail, and it applies identically to both halves of the pair.
Turning a pair into a series
Two photos are a diptych. Four are a story. Once you have the bump and newborn frames, the same setup extends naturally through the first year, and the milestones do the work of choosing dates for you.
| Frame | When | What to hold constant |
|---|---|---|
| Bump | Weeks 30–36 | Sets the template: spot, light, angle, palette |
| Newborn | Days 5–14 | Baby held where the bump was, same height |
| Sitting | 6 months | Baby sits unaided in the same chair |
| Standing | 12 months | Pulled up on the same chair, same crop |
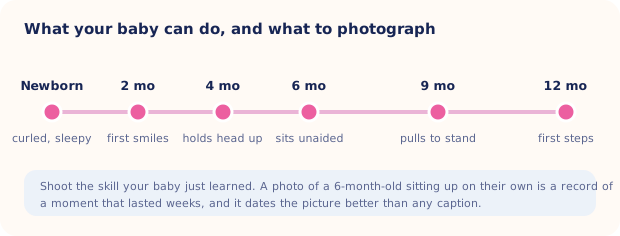
At six months most babies can sit unaided, and at twelve months they are pulling up and taking first steps, so each frame records a new skill rather than just a bigger baby. The timeline below shows why those dates work better than round numbers on a calendar. For the in-between months, monthly baby picture ideas covers the shorter intervals.
Details that echo across the set
Wide frames show the change. Close ones carry the feeling, and they are much easier to match because a pair of hands looks the same in any room.
- Hands. Two hands cradling the bump, then the same two hands cradling the baby. The most repeated pairing there is, because it works.
- A partner's hands, or an older sibling's. Same position both times. If you have a toddler, their hand on the bump then on the baby's back is worth more than any posed group shot. Sibling newborn photos has more on keeping the older one involved.
- One object in both frames. A knitted blanket draped over the bump and then wrapped around the baby. A wedding ring resting on the bump, then beside a tiny foot. A single object does more linking work than any caption.
- Feet and profiles. The bump in profile against the window, then the baby's profile in the same silhouette. Shoot both slightly underexposed and they pair beautifully.
How should you display the pair?
A pair wants to be seen together, at the same size, in matching frames, with a hand's width of space between them. Two 8x10 prints side by side is the standard for a reason. Other options that hold up:
- One frame, two apertures. A double mount puts both images behind a single sheet of glass and removes any question about spacing.
- A four-print row for the full series, left to right in date order, all one size.
- The first spread of a photo book, bump on the left page and newborn on the right. See baby photo book ideas for laying out the rest.
What resolution do you need to print the pair?
Export at 300 DPI for anything you print. An 8x10 needs roughly 2400×3000 pixels to look sharp on paper, and phone photos clear that easily as long as you did not crop aggressively. Printing baby photos goes through sizes and paper choices.

Make the newborn half look styled
Totti takes one clear photo of your baby and regenerates the background, lighting and styling with 50+ templates, including newborn poses like Sweet Slumber and Curled Taco, while preserving your baby's real facial features. Pick a neutral template that sits comfortably beside your bump photo, then export in HD at 2048×2560. Free to download on iPhone.
Get Totti on the App StoreShoot the bump photo somewhere you can stand again in two months, and write down where you stood. Everything else is a detail that can be fixed later. The spot and the light are the two things that make the pair land.